What if you could take the guesswork out of knowing whether moisture or water issues were lurking in the house you're buying. Wouldn't that give you peace of mind?
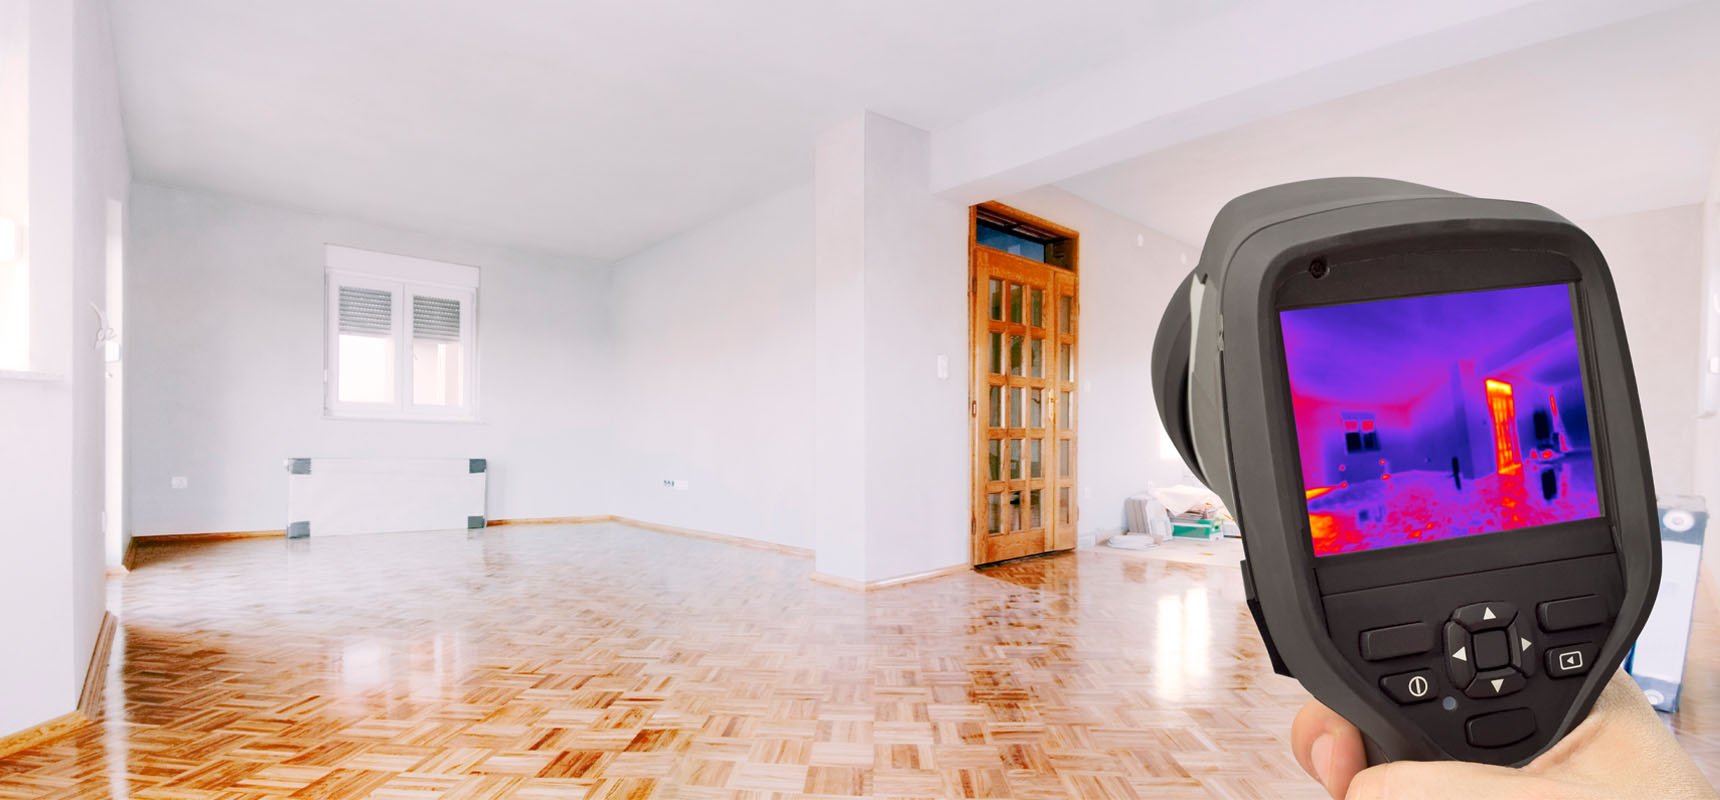
Whether you're buying a condo, single family, townhouse, or multifamily home, adding a thermal imaging scan to your home inspection can help you enjoy smooth sailing on move-in day and avoid big, expensive surprises.
A traditional home inspection report can only reveal so much. For example, it can pinpoint any visible structural issues or potential problems with the home's HVAC systems. But it can't see beyond what your naked eye can see -- a thermal imaging home inspection can -- it can see an undetected water leak or a prior plumbing repair that has gone bad.
A thermal imaging home inspection is to resale home buyers what CarFax is to buyers of a used car. It will help you avoid costly hidden problems down the road and give you peace of mind.
In this article, you'll learn:
- what is a thermal imaging home inspection,
- how it's performed,
- what areas it's focused on,
- how much it costs, and
- whether it's worth the investment.
We'll also discuss how the report is different from the 550-point home inspection and share some significant differences for Georgia and South Carolina.
What is a Thermal Imaging Home Inspection?
Thermal imaging is heat imaging. It is a process that involves a technology used to look at warm and cold heat signatures. It is conducted using a special camera that can detect infrared radiation.
We can only see the colors of the rainbow - the colors between ultraviolet and up to infrared, but our eyes can't see into the infrared or electromagnetic spectrum. And what the infrared can see is heat energy or lack thereof.
A thermal imaging camera can see in the infrared spectrum. The infrared spectrum will reveal warm and cold heat signatures. The colors of a warm-looking image are white and red. In contrast, a cold image is yellowish and blue.
Water and moisture absorb heat energy which causes it to have a cool signature. The infrared camera detects these cool signatures. So with a thermal imaging home inspection, we're looking for those cool signatures to indicate that there's possibly a water leak somewhere - a leak not visible through any other means and that can, left undetected, turn into a catastrophic issue.
Most leaks don't happen overnight. It may take many weeks or even months before the issue turns into a full-blown leak. And by then, it's usually done a lot of damage along the way. The goal of the thermal imaging inspection is to identify the hidden trouble spots early on so needed repairs can be made.
A certified inspector will use a thermal imaging camera, called a FLIR (Forward Looking Infrared), to conduct the thermal imaging home inspection as an add-on to a home inspection.
How is a Thermal Imaging Home Inspection Performed?
A thermal imaging home inspection is different from a regular home inspection. A complete regular home inspection is done first. After that, the inspector goes back through the home conducting a separate thermal imaging inspection. In preparation for the thermal imaging inspection, we'll run gallons of water throughout the house's sinks, toilets, showers and bathtubs during the ordinary course of the home inspection.
Because gravity brings the water down, we'll start at the top and work our way down. First, we'll see if any small leaks or signs of moisture show up after running the water. Then, on a multi-story house or finished basement, we'll go down to the next level, taking pictures with the FLIR around fixtures and below grade and even into any crawlspaces.
Common Areas to Inspect Using Thermal Imaging
During a thermal imaging home inspection, we will look at all the areas we have access to in a top-down approach. Here are the key areas we focus on and what we look for:
Ceilings
Starting at the top, we're looking for roof leaks by looking at ceilings on the upper floor, any knee walls, or anywhere that roof leaks could be coming through. Next, we'll look at skylights and vents.
It's important to note that we'll use our FLIR camera to look at ceilings in areas below any fixture or appliance that uses water.
Exterior Walls
We then use thermal imaging to see any penetrations through the outside walls, doors or windows. Next, we'll shoot around the windows, where the chimney meets the wall and the exterior roofline. Finally, we want to know if there's any potential caulking or flashing issues.
Plumbing Fixtures and Surrounding Areas
Level by level, we'll look at all the plumbing fixtures, the cabinets, floors, and the areas around fixtures and appliances. These include things like:
- sinks and the skink base
- toilets
- refrigerators
- ice makers
- bathtubs and shower units
- supply lines, and more
Foundation
Finally, we get to the lowest point of the house, the basement, crawlspaces, and the foundation itself. Everywhere we can go, our thermal imaging camera goes with us to tell the story of what it finds.
Examples Results Found in a Thermal Imaging Home Inspection
Here are four examples to give you an idea of how thermal imaging looks and works to identify hidden moisture issues.
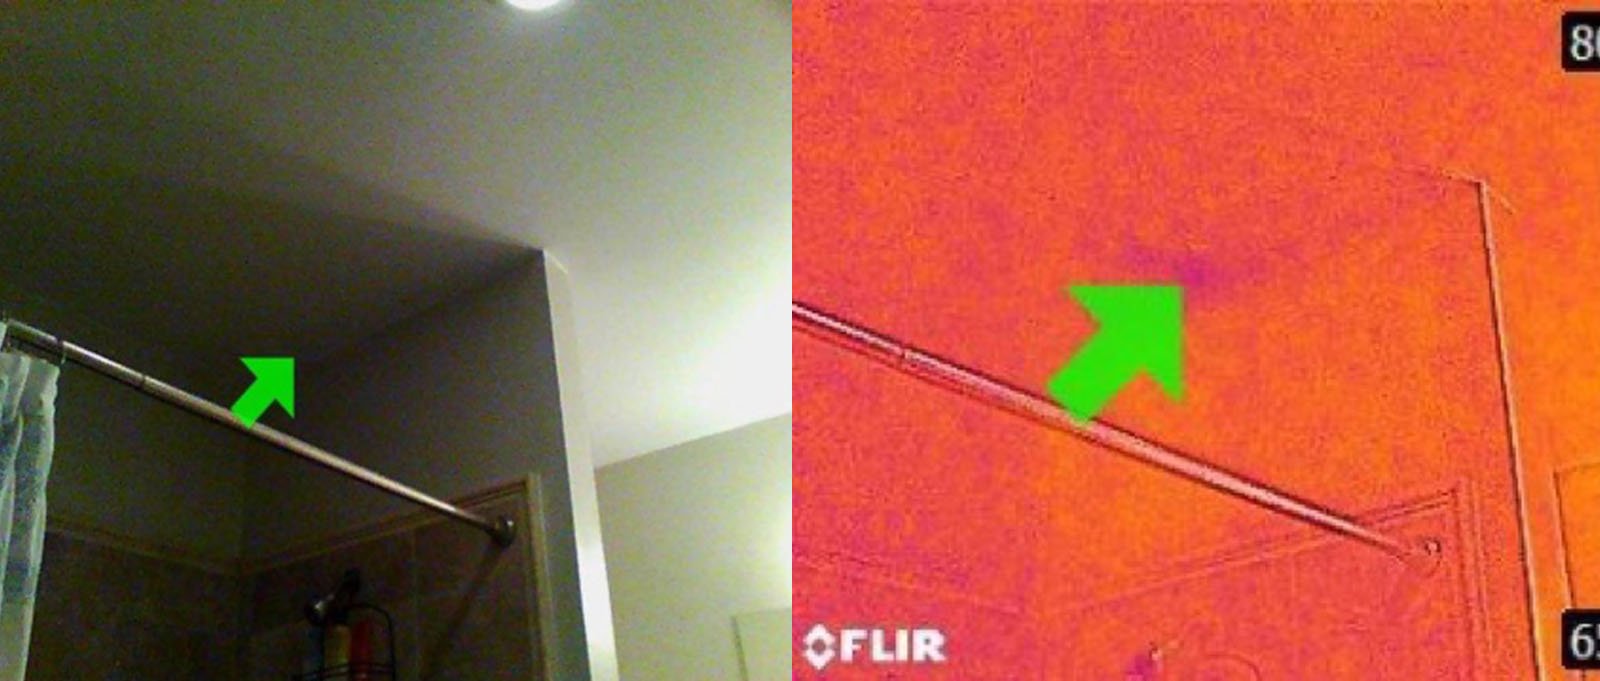
Moisture detected where a chimney meets the wall and roofline
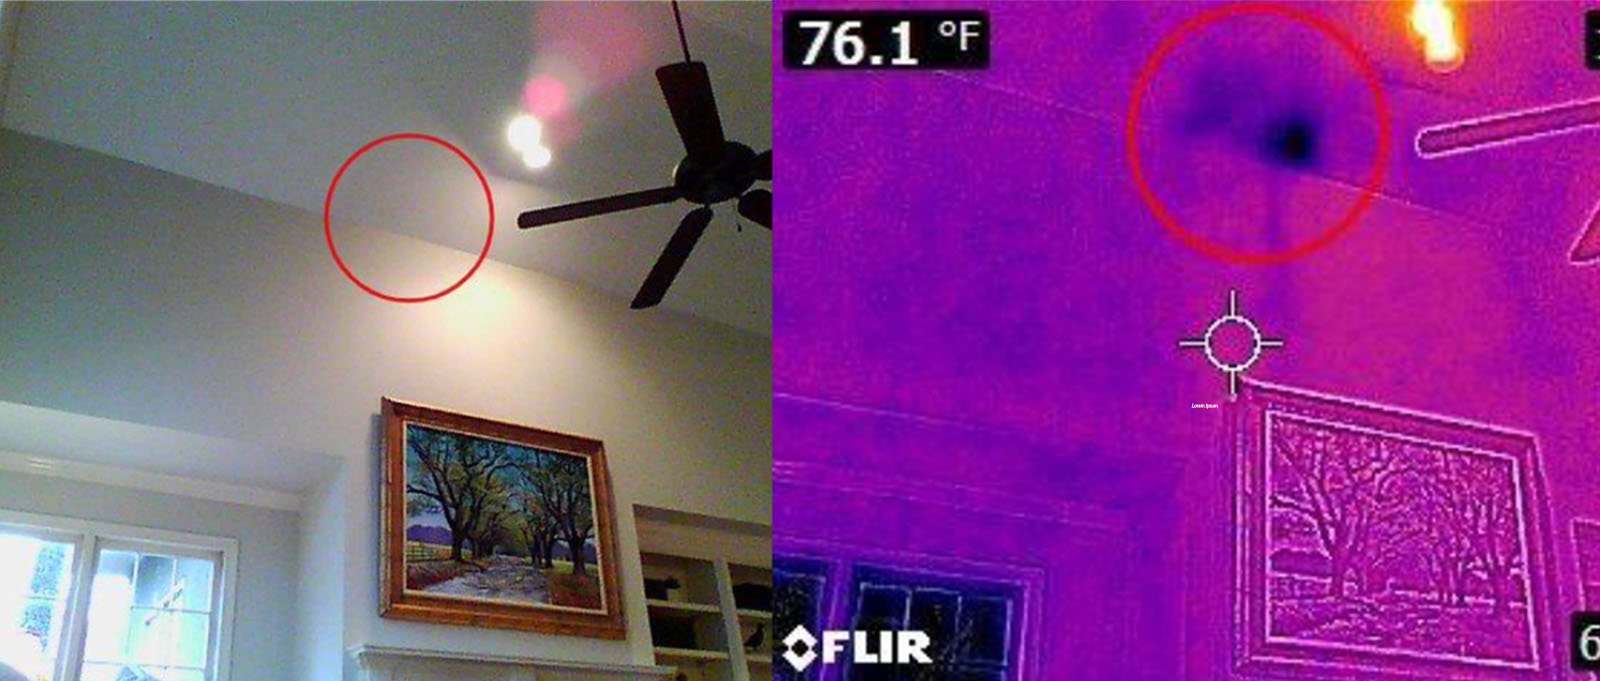
Everything looked acceptable to the naked eye, but a wet spot was detected with thermal imaging, probably caused by flashing that had come loose. Here, as in so many other cases, a regular home inspection would not have uncovered this issue. Without the thermal inspection, the homeowner would have been facing potential thousands of dollars in future damages.
Foundation water intrusion
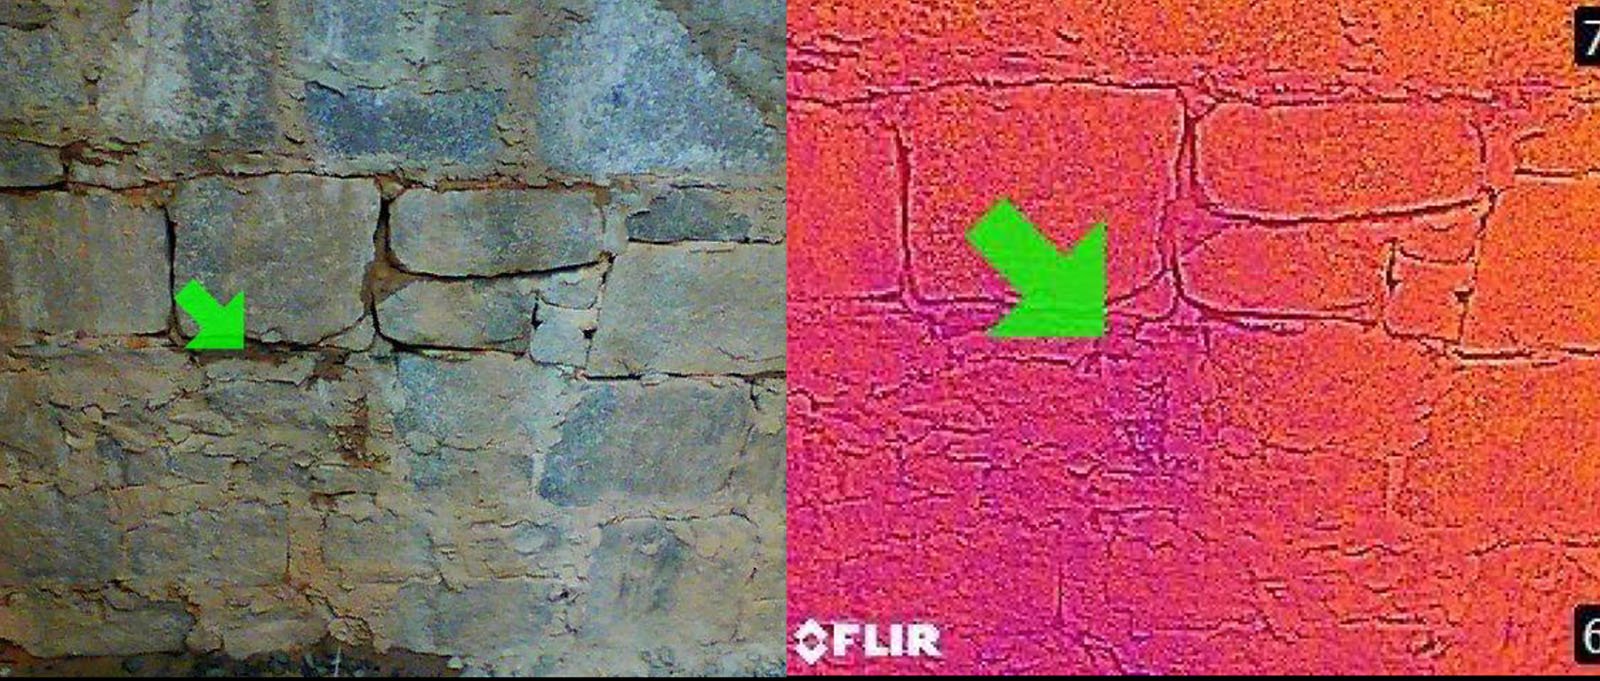
Here an anomaly was found where the wall meets the floor of a modern cinder block basement. The picture on the left looks normal. But when we looked at thermal imaging, it revealed a darker color right at the base where the wall meets the floor.
This anomaly prompted us to check the area with a moisture meter (as we do whenever and wherever we can). As a result, a high moisture level was determined to be present in that area.
Hidden plumbing leaks
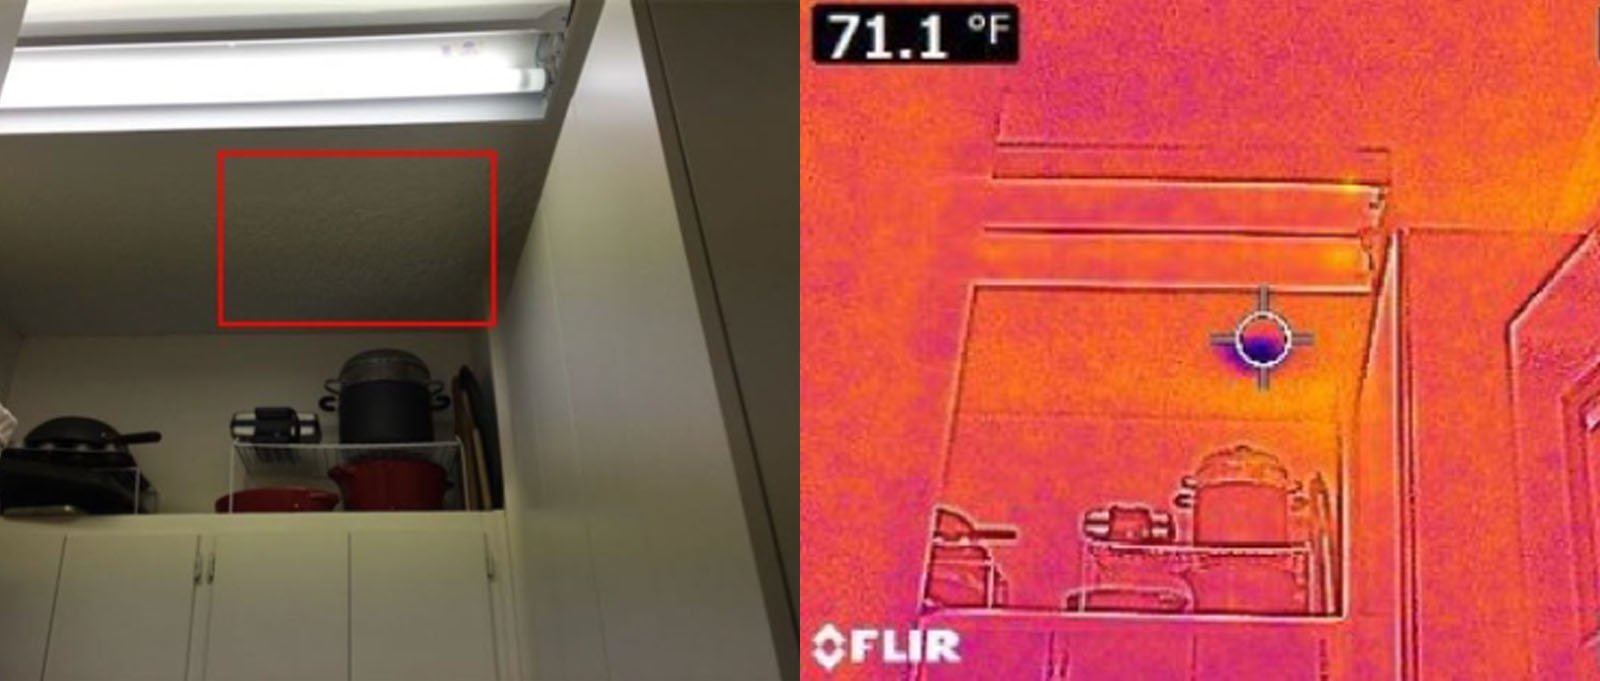
The photo on the right shows an area above the laundry room where the seller had repaired a leaky toilet just above it. They had patched and refinished the ceiling, and everything looked perfectly normal. But our thermal imaging camera told a different story; as you can see by the dark blue area, there was a buildup of moisture that had not yet leaked through enough to start discoloring the paint.
Bathtub leak in a condo
When buying a condo, you're going to want to know if any hidden leaks are coming from the unit above. For example, a bathtub leak from the above condo unit had not yet become visible. However, thermal imaging and a moisture meter revealed the tub above was leaking into the bathroom ceiling below.
Example Thermal Imaging Report
At Home-Probe, a thermal imaging inspection report is a separate, supplemental report from the primary home inspection. It is typically delivered to the homebuyer as a second report the morning after the inspection.
A thermal imaging report looks similar to the main home inspection report. And inside the report, you'll find the anomalies detailed in the key factors section. Again, these are issues that should be addressed relatively quickly.
The anomalies may not yet be significant issues. However, they're called out upfront so they can be addressed before turning into a major and more costly repair issue. You will also see them with photos in the area sections to show you the anomaly with commentary on what the inspector believes is going on.
Historically, most anomalies are found in the interior section of the report involving ceilings and walls. Beyond that, the structure section is likely to show deviations where weeping or water seepage is detected.
In addition to showing thermal imaging photos of anomalies, you can also expect to see representative images that show normal conditions. These are presented to give the homebuyer peace of mind and confirmation of a thorough inspection.
Is a Thermal Imaging Home Inspection Worth the Investment?
The fee for a thermal imaging home inspection by Home-Probe is $265 in addition to the traditional home inspection. So is it worth an extra $265?
Keep in mind that ordering a thermal inspection eliminates surprises, which means mitigating risks. It will give you peace of mind knowing that if there are issues, the cost to repair them now is minuscule compared with having to spend potentially tens of thousands of dollars for undetected water issues.
Research shows that the average leak damage cost of a bathroom is well over a thousand dollars. In addition, average repair costs can be upwards of eight thousand dollars or more. So catching these leaks early, when it's maybe a few hundred dollars to fix, is definitely worth the investment of $265.
And knowing there are no anomalies present offers its own valuable certainty.
Differences for Thermal Imaging Home Inspections in Georgia and South Carolina
Homebuyers moving to the South may not be aware of construction and soil differences. Not only is there a lot more water to contend with in states like South Carolina and Georgia, but houses are also built differently.
Most basements in the South are only underground on two or three sides. Therefore, these basement structures that may also be cut into a hill have more of a tendency for water leakage. So this is another consideration for ordering a thermal inspection.
Not only that, but Georgia’s clay soil holds water closer to the foundation. This can cause water seepage into and below the foundation.
What Certifications or Training is Needed to Conduct a Thermal Imaging Home Inspection?
Anyone can purchase a FLIR thermal imaging camera, but not everyone will know how to use it or decipher and interpret its findings. Not without specialized training.
Home-Probe's team of thermal imaging inspectors has undergone a regimen of training and certification as outlined below.
Level I Certified Thermographer
Tom Lloyd is a Level I Certified Thermographer with Home-Probe. He participated in a four-day intensive training course offered by the Infrared Training Center.
In-House Thermal Imaging Training Program
Tom took what he learned at the level one course and paired it up with some additional classes offered by FLIR remotely. He then developed a training program, requirements and standards for Home-Probe's inspectors.
Field Training
After our inspectors do their book work, they spend several days in the field. Field training involves:
- Working with the FLIR camera,
- Looking for anomalies, and
- Learning how to deal with them.
The hands-on field training is followed by writing and reviewing reports. Afterward, reports are pulled randomly, reviewed, and analyzed for quality control. Our training program is comprehensive, and we're always learning.
Final Thoughts
It should not go without saying, not every anomaly is moisture or a hidden water leak. Our highly-qualified and experienced inspectors aren't just looking for anomalies within the pictures. They're also looking to understand what they're seeing and will rule them out, if warranted, before putting them as key factors in the report.
Leveraging a thermal imaging home inspection empowers homebuyers to extend their knowledge on the status of the home beyond what the human eye can see. It’s an add-on service that provides peace of mind during a fast-paced time of high excitement.